
Congratulations on your POI Pilot connected. After activation (see the quick start guide in the device packaging), the POI Pilot connected is ready to use immediately and already optimally configured. However, if you would like to further adapt the device to your personal needs, the following guide provides a complete overview of all functions and settings of the POI Pilot connected.
An important note in advance: If you experience comprehension issues or cannot manage certain functions or settings even after reading the guide, don’t waste time and contact our Support. We will assist you quickly, competently, and patiently until your issue is resolved.
Table of Contents
POI Pilot connected Hardware
POI Pilot connected Display
POI Pilot connected General Operation
POI Pilot connected Warning Settings
POI Pilot connected System Settings
POI Pilot connected Settings for Auto Start/Stop/Motion Alarm (from 09/2023)
POI Pilot connected Functions via Key Combinations
POI Pilot connected Update or Change of Voice Output Language
POI Pilot connected Error States and Solutions
POI Pilot connected Hardware
The following image shows the key features of the POI Pilot connected:
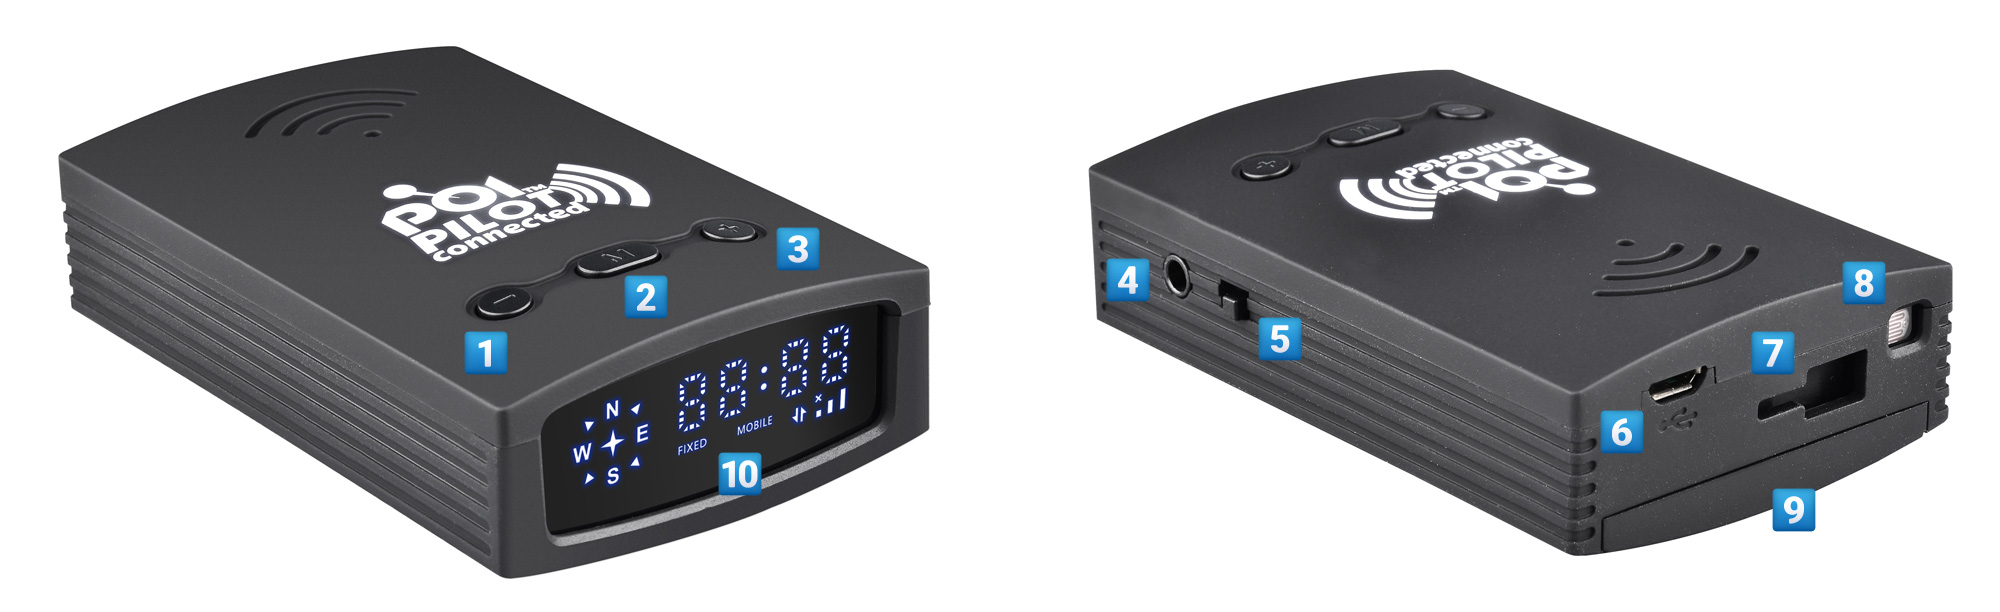


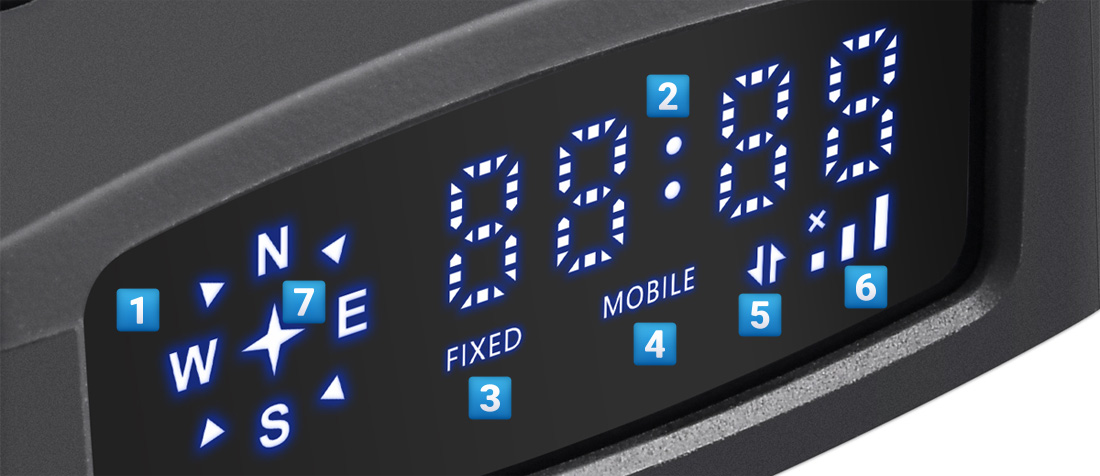
Display
General Operation of the POI Pilot connected
After inserting the battery into the battery compartment (9) and charging it via the Micro-USB port (6), the device can be switched on using the side slider (5). The device can only be operated with the battery inserted!
After switching on, all elements of the display briefly light up; afterwards the main display (2) shows the date of the last data update, e.g., 20:10 for October 20. The device start is announced acoustically and the current battery level is spoken.
Then the compass (1) rotates and the device searches for a GPS signal. The initial GPS search may take 60–90 seconds at first startup and should ideally be done while stationary, not while driving. After a few seconds, the main display (2) shows the time. As soon as the device has determined the location via GPS, the star (7) within the compass rose lights up continuously. The device acoustically announces readiness for operation as well as the time of the last data update. While driving, the time display switches to the current speed.
Shortly after startup, the device automatically establishes a GPRS connection to the update server and checks whether a current firmware and/or updated speed camera or hazard data is available. The GSM signal strength indicator (6) shows whether and how strong GSM reception is. A successful connection to the update server is indicated by the server connection symbol (5). A firmware update is shown with the display “FU 0–100”. A larger data update is shown on the display with “UP 0–100”. If only a small amount of data is affected by an update, the server connection symbol (5) flashes briefly three times at the end.
While driving, the data is automatically updated at regular intervals (every 10 minutes in the default settings). An automatic update only occurs while driving!
While driving, the POI Pilot connected warns of fixed and same-day mobile speed cameras (default setting) both visually and via voice output. During a warning, the symbol FIXED (3) for fixed or the symbol MOBILE (4) for mobile cameras is displayed, and the remaining distance to the camera (or hazard) flashes in the main display (2). A voice message is issued with an additional warning when the speed limit is exceeded. Upon reaching the camera or potential camera location, a “shutter” sound is played, ending the warning process.
POI Pilot connected Warning Settings
The warning settings for fixed cameras (L1), mobile cameras (L2), hazards (L3), and other POIs (L4) can be configured separately. The following settings are available
(values in parentheses show the display text; defaults are in red):
Acoustic warning
Off (OFF), On (ON), Warning only when speeding (SP)
The acoustic warning provides voice alerts for hazards and for exceeding the speed at or near the hazard.
Visual warning
Off (OFF), On (ON), Warning only when speeding (SP)
The visual warning flashes the remaining distance to the hazard on the display and shows the type of hazard.
Warning tolerance
Off (OFF), 1–50 km/h (1–50)
The warning tolerance relates to the setting “Warning only when speeding (SP)”. A value of +5 km/h means you are only warned before a 50 km/h camera if you would be driving faster than 55 km/h. A value of +10 km/h means you only receive a warning if you drive faster than 60 km/h, etc.
Lead time for first warning
20 seconds (20), 25 seconds (25), 30 seconds (30), 35 seconds (35), 40 seconds (40)
Time between the first warning and the reported camera or hazard. Higher seconds = earlier warning. However, longer lead times can increase false warnings (e.g., hazards on parallel roads).
Lead time for second warning
Off (OFF), 5 seconds (5), 10 seconds (10), 15 seconds (15)
If an additional second warning is desired, set the value for the second warning to e.g., 10 seconds.
Warning angle
80 degrees (80), 25–140 degrees (25–140)
Expert setting! The warning angle describes the width of the search cone in the driving direction. A narrow angle (low numbers) reduces the likelihood of false warnings for cameras off the route (e.g., on parallel roads). However, a narrow angle (low numbers) may cause late or unreliable warnings for cameras after tight bends.
There are also the following additional settings for mobile cameras (L2):
Recency
same day only (0), 1 year (1), 2 years (2), 5 years (5), all (ALL)
This important setting determines whether, in addition to same-day live mobile cameras (default), potential mobile camera locations should also be reported that have been active in the last 1–5 years, or even all known mobile locations. Warnings for potential locations provide maximum safety but also mean warnings may occur at places not currently active.
Changing the warning settings
Press the M button and use the Plus/Minus buttons to switch between L1 (fixed cameras), L2 (mobile cameras), L3 (safety POIs), and L4 (other POIs). Confirm a selection with the M button; the first setting of the submenu then appears. Use Plus/Minus to navigate between settings. Press M to open a specific setting. Once the option on the display is blinking, adjust the value with Plus/Minus and save with M.
Example 1: You want to enable potential mobile cameras by changing the “Recency” setting in L2 (mobile cameras). Press the following buttons:
> M button (display L1 – voice: “Settings fixed cameras”)
> Plus button (display L2 – voice: “Settings mobile cameras”)
> M button (display ON – voice: “Acoustic warning, on”)
> Plus button (display ON – voice: “Visual warning, on”)
> Plus button (display 0 – voice: “Recency same day only”)
> M button (display 0 blinks – voice: “Recency same day only”)
> Plus button (display 1 blinks – voice: “1 year”)
> Plus button (display 2 blinks – voice: “2 years”)
> M button (display 2 – voice: “Recency 2 years”)
For all settings, it is important to proceed quickly, as the POI Pilot connected returns to the normal view after a few seconds without key presses.
Example 2: You want to completely disable the acoustic warning for hazards (safety POIs).
> M button (display L1 – voice: “Settings fixed cameras”)
> Plus button (display L2 – voice: “Settings mobile cameras”)
> Plus button (display L3 – voice: “Settings safety POIs”)
> M button (display ON – voice: “Acoustic warning, on”)
> M button (display ON blinks – voice: “Acoustic warning, on”)
> Plus button (display OFF blinks – voice: “Acoustic warning, off”)
> M button (display OFF – voice: “Acoustic warning, off”)
Tip: All settings can also be changed via the web interface using the button POI-Pilot Settings > POI Settings. If you have trouble understanding the device menu concept, use the web interface! More info under POI Pilot connected Functions via Key Combinations
POI Pilot connected System Settings
The system settings are found in menu L5 and apply equally to all POI types.
Update interval
Off (OFF), 5 minutes (5), 10 minutes (10), 30 minutes (30), 60 minutes (60), 2 hours (2)
The update interval specifies how often the POI Pilot connected should check for updates. The GSM receiver is deactivated between intervals to save energy and significantly extend battery life. A short interval greatly reduces battery life. If the update interval is set to “Off (OFF)”, no data update is performed (flight mode); this state is acoustically announced at startup as “Attention, data update deactivated”.
Auto Start/Stop (valid only until version 08/2023)
This setting is available only for devices sold up to approx. 08/2023 (batch no. 179662, 176982). On newer devices (batch no. 184377), Auto Start/Stop is controlled by a motion sensor and is activated via the special L6 menu (see below).
No (NO), Yes (YES)
With Auto Start/Stop, the device can automatically switch on and off (sleep mode) with the ignition. To use this function, a vehicle is required where the car socket (when using the in-box car power adapter) or a USB port is switched with the ignition. Most vehicles support this.
If Auto Start/Stop is activated on the POI Pilot connected (state Yes), the device automatically enters sleep mode when power via the USB port is removed. In this mode, the battery lasts many weeks. As soon as power is available again at the USB port, the POI Pilot connected starts automatically.
Important note: If the device is not used for many weeks, be sure to switch it off using the side slider (OFF = position away from the display), otherwise the battery may fully discharge and should not be stored in a depleted state.
Brightness
Automatic (AU), 1 (dark) – 8 (bright)
On the back of the POI Pilot connected there is a brightness sensor that handles automatic brightness control. If ambient brightness is high, the display is set to maximum brightness. If it is dark (e.g., at night), the display is dimmed to avoid glare and save energy. Alternatively, brightness can be set manually from 1 (dark) to 8 (maximum) if, for example, the sensor is covered due to the installation situation.
Time zone
+1, +12 to -12
UTC time zone setting; usually no adjustment necessary.
Automatic daylight saving time switch
Yes (YES), no (NO)
For countries with daylight saving time (e.g., Germany), this should remain enabled to have the correct time automatically throughout the year.
Shutter sound (only in versions from 09/2023)
This setting is available only for devices from 09/2023 or batch no. 184377.
Yes (YES), no (NO)
The shutter sound is played when passing a camera at its location if this setting is “Yes”.
Unit
km/h (0), miles (1)
Switches the unit for speed display.
Startup messages
detailed (det), short (sht), off (OFF)
Startup messages are spoken after the device starts and can be shortened (e.g., skip battery level and last update) or disabled entirely.
Display off when no warning
no (NO), yes (YES)
Normally, the display is always active and shows either the time (when stationary), the speed (while driving), or the distance to the hazard (during a warning). If this option is enabled (“Yes”), the display only turns on during a warning. This option can significantly extend battery life (by several hours).
Speed warning
Off (OFF), 40–210 km/h (40–210)
The speed warning works like a cruise alert and warns when the speed set in the settings is exceeded. This warning is independent of the speed camera/hazard warnings and is an additional alert. Useful, for example, if winter tires have a specific speed limit or when towing a trailer and you don’t want to exceed a specific individually set speed.
Speed adjustment
0 (0), -12 to +12 km/h (-12 to 12)
When using the POI Pilot connected, you will quickly notice that the speed shown on the display differs from the vehicle’s speedometer and is usually lower. By law, vehicle speedometers have a certain positive tolerance and show a slightly higher speed than actually driven. The speed determined via GPS in the POI Pilot connected is very accurate. If you still want to align the displayed speed with the car’s speedometer, you can do so here. We strongly recommend NOT making this adjustment!
Reset to factory settings
Reset to factory settings (YES)
If confirmed with the M button, all settings (warning settings L1–L4 and system settings L5) are reset to defaults. Data is not deleted in this process.
POI Pilot connected Auto Start/Stop/Motion Alarm (from version 09/2023)
The L6 menu is only available in the POI Pilot connected if the device was purchased after 09/2023 (batch no. 184377).
Instruction videos Auto Start and Motion Alarm
Auto Start/Stop
NO (NO), Yes (YES), Yes + Motion alarm (YES)
On new devices from 09/2023 (batch no. 184377), Auto Start/Stop is controlled by a motion sensor. If Auto Start/Stop is enabled, the device starts automatically when motion is detected and switches off automatically after the shutdown delay.
If this option is set to “Yes + Motion alarm”, a warning email is sent when the motion alarm is triggered. An additional acoustic alarm can be enabled; see the “Motion alarm, acoustic warning” setting below.
Important note: If the device is not used for many weeks, be sure to switch it off using the side slider (OFF = position away from the display), otherwise the battery may fully discharge and should not be stored in a depleted state.
Shutdown delay
30 seconds (30), 60 seconds (60), 3 minutes (3), 5 minutes (5), 10 minutes (10), 30 minutes (30)
Time until the device switches off when no motion is detected.
Motion detection sensitivity
+9, +1 to +10
The higher the value, the higher the motion detection sensitivity.
Motion alarm cancellation conditions
External power connected (1), briefly press Minus button (2), External power connected or briefly press Minus button (3)
If a motion alarm is enabled, the cancellation condition determines how triggering the alarm can be prevented during the trigger delay. By default, supplying power (ignition on) or briefly pressing the minus button prevents the alarm from triggering.
Motion alarm trigger delay
1 second (1), 5 seconds (5), 15 seconds (15), 30 seconds (30), 60 seconds (60), 120 seconds (120)
Time between motion detection and the motion alarm being triggered. During the trigger delay, cancellation is possible according to the cancellation conditions (see above).
Motion alarm acoustic warning
Off (OFF), 15 seconds (15), 60 seconds (60), 2 minutes (2), 4 minutes (4)
In addition to the warning email, an acoustic warning on the device can be enabled. For the acoustic warning to occur, the “Auto Start/Stop/Motion alarm” must be set to “Yes + Motion alarm” (see above). The “Motion alarm acoustic warning” setting enables the additional acoustic alarm and sets its duration.
POI Pilot connected Functions via Key Combinations
Louder and Quieter
Key combination: Briefly press Plus or Minus
A short press of Plus or Minus increases or decreases the volume of voice output/warnings. The volume is shown as a number on the main display. The voice output can be completely disabled by setting the value to 0.
Report a new camera or hazard
Key combination: Press the M button for 3 seconds
Saves the current GPS position. Use Plus/Minus to select the type of report: 1 = fixed camera, 2 = mobile camera, 3 = safety POI, 4 = other POI. Confirm with M. For cameras, select the permitted speed using Plus/Minus and confirm with M. After confirmation, the POI Pilot connected automatically connects to the update server, uploads the report, and makes it available to all users.
Note: Reported cameras and POIs are marked with a special warning until they have been reviewed by a user or the POI editorial team. The warning says, for example:
“Attention, fixed camera in 500 meters, reported via POI-Pilot; please assign to a suitable category at pilot.poibase.com.”
If possible, reported cameras or hazards should be post-processed in a browser via the interactive map and assigned to a suitable category.
Delete, confirm, or activate existing cameras or hazards
Key combination: Press the M button for 3 seconds during the warning
If the M button is pressed for 3 seconds during an active warning or up to 5 seconds afterwards, the camera or hazard just reported can be deleted, confirmed, deactivated, or activated. Select the action using Plus/Minus, then execute it with M. The change is automatically transmitted to the server and made public.
Confirm: Fixed cameras or hazards can be confirmed, helping our editorial team improve data quality.
Activate: Mobile camera locations already present in the database as potential mobile cameras can be activated through this action and then count as same-day active cameras. Please use this function whenever you see an active mobile camera but were only warned of a potential location.
Delete: Completely removes the camera or hazard from the public database. Please use carefully and deliberately. False reports are detected by the editorial team and may lead to the blocking of the POI Pilot connected.
Panic button: delete all cameras
Key combination: Press and hold Plus and Minus together for 3 seconds
Warning: Permanently disables the camera warning function on the device and means the device can no longer be used as an operational camera warning device. To reactivate the warning function, the device must be re-enabled via the settings in the browser.
Query battery level
Key combination: Briefly press Plus and Minus together
Announces the current battery level and shows it on the main display. Please note that the battery level on the POI Pilot connected is only a rough guide and the measured/spoken level may fluctuate slightly depending on operating state.
Manual data update
Key combination: Press M and Plus together for 3 seconds
Triggers a manual data update. This function is usually unnecessary because all updates occur regularly and automatically.
Send or receive settings
Key combination: Press Plus for 3 seconds to send, Minus for 3 seconds to receive
Sending/receiving device settings only makes sense if the page for the POI Pilot connected settings is open in a browser. After opening the POI Pilot connected settings in a web browser, it will first prompt you to send the settings from the device. To do this, press the Plus button for 3 seconds. The device announces “Send settings” and the web browser shows the current device settings a few seconds later. The settings can then be adjusted and saved in the browser. Afterwards, the browser will prompt you to receive the settings back onto the device by pressing the Minus button for 3 seconds.
Reset to factory settings
Key combination: Press all buttons together for 3 seconds and confirm with the M button
This key combination resets all settings to their defaults. The camera and hazard data is not deleted by this process.
POI Pilot connected Update or Change of Voice Output Language
The POI Pilot connected currently supports the following languages for voice output: German, English, and French. To change or update the voice language, the voice file on the POI Pilot connected must be replaced. To do this, connect the device to a PC or Mac via the USB cable; it will be recognized as a USB flash drive (mass storage). Download the voice files and find further details on the update and replacement in the section Settings > Language.
POI Pilot connected Error States and Solutions
The POI Pilot connected is designed so that all error states are communicated intuitively to the user via clear voice output.
We will maintain answers to the most frequently asked questions (FAQs) here once we receive them frequently through our Support.
Finally, we would like to ask all users of the POI Pilot connected to contact our fast, competent, and patient Support directly if they have any questions or problems.